For example, why can’t I make a bookmark out of a piece of text in iBooks Author if that text is in a text box?

For some obscure reason, only text in the main flow of the document can be made into a bookmark — if you put, say, a sidebar or a table in a text box of its own, you can’t easily link to it at all. Similar annoyances exist with other objects that you might want to link to: if you have an image or a widget, for example, it can’t be a bookmark.
You can link directly to text boxes, images and widgets, but only if you give the object a title with a label that’s actually displayed. You do this on the Widget section of the inspector window:
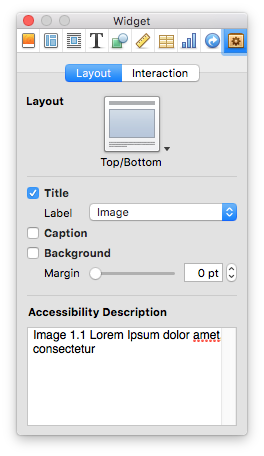
Unless both the title is displayed and the title has a label, you can’t create a link to your object. Once it does, you can link to it easily enough from the Link tab of the inspector window.
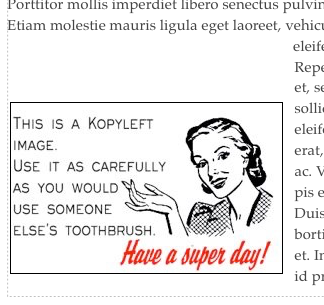
This is ridiculous, because what if you don’t want a title displayed at all? Or if you do want a title, but not the label because that forces your images to look like this:

Well, if you don’t want that, then it’s no linking to images or widgets for you …
A Workaround
… or maybe you can after all, if you’re clever about it. You see, you can hide the title. It’ll still be there, but nobody will see it so it won’t be a nuisance. Even better, much of this you only need to do once and the title will be gone on all the images in your document.
First of all, select the title of an image by triple-clicking on it:

Go to the Text section of the inspector window and then to the Text tab there:

Click on the colour well — the (in this case red) rectangle directly below the word “Color” — so that the colour window opens. In that, move the Opacity slider (at the bottom) all the way to 0%:

You’ll see the title disappear from your image or widget, but it’s still there and selected, as you can tell by the pale blue bar:

If you click on something else, the blue that indicates the selection will go away, but you’ll be left with a big ugly gap above your image:
So, while the title is selected, what you do now is to set it to 1 point in size, using the toolbar at the top of the iBooks Author window:

(If this isn’t visible, click on the menu View → Show Format Bar.) 1 point is the minimum size iBooks Author will allow. By setting it this small, the title will all but disappear:

If your image is to be located at the bottom of the page with no text below it, you may also want to move the title to below the image, which you can do on the Widget section of the inspector window.
To make this the default for all images, make sure the title is selected and open the styles drawer (in the View menu), then right-click the “Figure Title" style (or whichever one is selected) and choose “Redefine Style from Selection” from the menu that appears:

If you do want the title but not the “Image 1.1” bit, you can use the same trick, but make the character style used for that part (Figure Label, for images) invisible rather than the whole title.
A Minor Snag
One problem with this is that changing the object’s title is difficult because you can’t see it and don’t know what you’re changing. (Why would you want to? The main reasons I can think of is for yourself, because the title is displayed in the hyperlink window, and for other people, because the title may be read by screen readers or other access devices for the visually impaired. For both reasons, you’ll want to make sure the title is accurate and not just some random bit of text like in the example shown here.)
The simplest solution is to only make the titles invisible once they’re all to your liking — that way, you can edit them easily and actually see what you’re doing. The drawback is that you have to put them all in and make sure they’re right before you can hide them and finish your layout.
You can also edit the titles after you’ve hidden them, because you can still see where they are: if you click on the object, you’ll see a thin blue line above or below (depending on where you put the title). Put the tip of your mouse pointer on that and double-click — if you’re in the right spot you’ll select the title and can type a new one. (Tip: if you didn't change the accessibility description in the widget inspector, it’ll show the new title after you click on something else and then back on your object. However, this doesn’t work the other way round: if you manually change the accessibility description, it gets disconnected from the title and neither of the two will change with the other anymore.)
You can also edit the titles after you’ve hidden them, because you can still see where they are: if you click on the object, you’ll see a thin blue line above or below (depending on where you put the title). Put the tip of your mouse pointer on that and double-click — if you’re in the right spot you’ll select the title and can type a new one. (Tip: if you didn't change the accessibility description in the widget inspector, it’ll show the new title after you click on something else and then back on your object. However, this doesn’t work the other way round: if you manually change the accessibility description, it gets disconnected from the title and neither of the two will change with the other anymore.)
No comments:
Post a Comment